Parquet board is one of the most popular materials for flooring. She gained her popularity not only due to aesthetic appeal, but also due to her quality characteristics. The process of laying a parquet board is simple and does not require special qualifications; an amateur can put it on.

DIY flooring laying - technology features
An independent flooring of a parquet board will help to significantly save the expenditure part of the budget allocated for repairs. To do this, you need to study the main points of the technology and be able to handle tools. In order for the coating to last for many years, it is important to know some nuances of how to properly put it:
 It is not recommended to lay the board in rooms with high humidity and operational load (bathroom, toilet, corridor).
- The key to success is careful preparation of the foundation. The surface should be smooth, without cracks or damage. Also make a substrate of two layers.
- Before starting the installation, the material should lie in the room for about two days. It is especially important to do this in the winter season, when the difference between the temperature indoors and outdoors is significant. In this case, it is better to remove the boards from the packaging film.
- Planks are placed in the direction of the stream of natural light. This will visually hide the joints of the rows.
 It is not recommended to lay the board in rooms with high humidity and operational load (bathroom, toilet, corridor).
ATTENTION. Before starting work, you need to select a laying pattern and calculate the required amount of material. It is necessary to know the dimensions of the boards of the last row, since in most cases they have to be cut.
Essential tool
Special mechanisms are not required, and they are easy to find in almost every home. Consider the main devices:
- hacksaw or jigsaw;
- bar made of plastic for tamping;
- expansion wedges;
- rubber mallet;
- screwdriver;
- tape measure and triangle;
- clamp.
Step-by-step instruction
Read more about how to correctly lay a parquet board. It should be noted that the process is different from laminate flooring and parquet. Follow the instructions and recommendations in this article.

Subfloor preparation
Before laying, check the floor base. It can be either wooden, concrete, or tiled. The permissible maximum height difference should be 1-3 mm per linear meter. A moisture meter is used to measure humidity. It should be within 2-3%.
If the base has irregularities, then special dry mixes should be used. Each defect must be eliminated, and if necessary, pour a new screed. If the floor is wooden, then make it polished or completely sort it out. Laying on moisture resistant plywood is recommended.
IMPORTANT. It is recommended to lay the board at an indoor temperature of 20-25 degrees and a humidity of 40-60%.
Preparing for paving
 Before starting work, the base is again examined and vacuumed. After all, even a small pebble can harm the coating. Mandatory laying of materials on the substrate. They also make high-quality waterproofing to increase thermal insulation characteristics. Thanks to the substrate, the boards can move slightly relative to the base. This, in turn, will avoid material damage due to different expansion under the influence of external factors.To reduce humidity, apply a vapor barrier film or primer. The film is spread in strips of 15-20 cm in overlap. It is led onto the walls up to 5 cm high. Next, the substrate is laid on top. The bands are connected with tape. The distance between the wall and the heat insulator should be up to 1 cm.
Substrate Selection
Construction hypermarkets have a wide range of substrates. Before making a choice, it is necessary to clarify their compatibility with various types of boards. Consider the main ones:
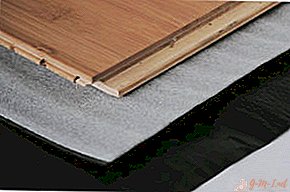 Soft materials such as cork and polyethylene foam are easy to install and have a low cost. And in combination with foil, they are very resistant to moisture. However, they can quickly subside.
- The cork well conceals flaws and has good sound insulation. The floor will not creak or deform.
- Expanded polystyrene is environmentally friendly, holds its shape well and is not affected by insects.
- Coniferous substrate is a novelty in the construction industry. It is made from natural ingredients, environmentally friendly and water resistant. The main disadvantage is the high cost.
 Soft materials such as cork and polyethylene foam are easy to install and have a low cost. And in combination with foil, they are very resistant to moisture. However, they can quickly subside.
Recently, special substrates for laminate flooring, which can be bought in construction stores, are gaining popularity. But to use carpets, carpet and linoleum as a substrate is extremely undesirable. These materials can warp and pull parquet boards along. In addition, the old coatings have already absorbed unpleasant odors that are unlikely to hide.
Methods for installing a parquet board
There are several options for attaching the board: floating, using additional mounts and glue. Each of them has its own characteristics. The choice of installation depends on the type of lock system. The packaging should contain detailed instructions and appropriate diagrams.
Floating styling
This method is the most common. It is also called independent. The surface is assembled on its own locks and is not fastened to the base. However, it is relevant if the thickness of the die does not exceed 14 mm. Similarly, the installation of the laminate. The method is good in that if errors were made in the installation, they can be corrected. Follow these steps:
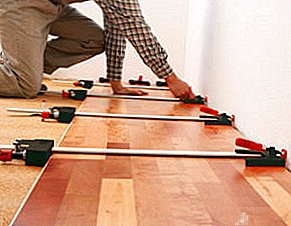 The board is laid along the longest wall in the direction from left to right. At the same time, part of the castle compound facing the wall is removed from it.
- The surface should retreat 15 mm from the wall. To do this, collect three rows, put wedges and pull the canvas in the right position. Each subsequent row is laid with a shift.
- Subsequent rows are collected sequentially, knocking out with a rubber mallet.
- Difficulty may arise in the last row. It is important not to forget to leave a distance to compensate for thermal expansion.
- Then remove the wedges and proceed with the installation of baseboards and door sills.
 The board is laid along the longest wall in the direction from left to right. At the same time, part of the castle compound facing the wall is removed from it.
Glue mounting
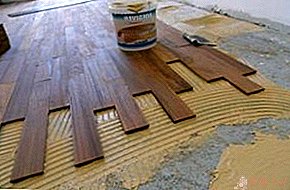
The glue method involves gluing the boards together. It is used even with dice thickness over 14 mm. This method is used when it is important to achieve rigidity of the base in large rooms. It is necessary to purchase a polymer-based adhesive. It is applied to any type of screed (cement, chipboard, plywood and others). It is not advisable to buy water-based formulations due to possible deformation of the coating. Installation is done in the following sequence:
 Start laying with the longest wall. Before applying glue, the board is laid out and the last one is cut. Spacers should be installed between the first row and the wall.
- On the surface, glue is applied a little more than the width of the board and distribute it evenly.
- When laying, the boards are immediately joined and pressed tightly against each other. Further, additionally fixed with screws.
- The next row is laid exactly the same with a shift of half or a third of the length.
- The finished coating is left for several days to dry completely. Then set the thresholds and skirting boards.
 Start laying with the longest wall. Before applying glue, the board is laid out and the last one is cut. Spacers should be installed between the first row and the wall.
REFERENCE. The significant disadvantages of the adhesive method include the complexity of the work and significant costs for high-quality glue. In addition, mistakes made in the future will be impossible to correct.
Installation using additional hardware
This method involves the use of self-tapping screws, and can be applied to boards with a thickness of 20 mm or more. Fasteners start in the groove at a certain angle. In addition, each plank is rigidly fixed to the base. For work, you need finishing hardware, air studs or ordinary wall plugs and nails.
The optimal solution for this method is lag construction. Heat-insulating and sound-insulating materials can be placed in the forming space.
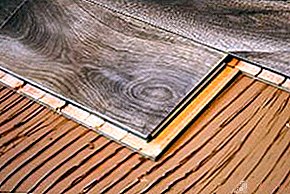
ATTENTION. If a long service life of the flooring is expected, then it is covered with a layer of varnish. At the same time, joints are filled, and water and dirt do not penetrate into the surface.

Laying a parquet board can be done independently, without the help of professionals. It is important to correctly approach this process, carefully study the technology and implement the recommendations.
Leave Your Comment