The kitchen is considered the unspoken center of any home. Here the family gathers at the table, and the hostess of the house prepares various treats, to the delight of her loved ones. Therefore, it is so important that this place is the embodiment of comfort and warmth. And to give a certain charm to the kitchen certain household items help. Such a necessary thing is a bread box.
Do-it-yourself bread box of various materials.
Some housewives still store buns and bread in bags, but it does not look aesthetically pleasing, and baking muffins in polyethylene. That is why a bread box in the kitchen is a must. This practical and convenient accessory can be bought at any household goods store, or in the cookware department. But you can go the other way and make the accessory yourself. Such a product will have a lot of advantages:
- You can choose the material for work;
- do the thing for an individual design that will be in harmony with the interior of the kitchen;
- Be creative in the process and enjoy your work.
And also, a product made by yourself will be exclusive and unique.
Important! Use a variety of creative materials: wood, fabric, paper, and even plastic bottles.
A master class on how to make a bread box from plastic bottles.
Recycling plastic bottles can be very beneficial. Plastic is a universal material, and from it you can make almost a mountain of useful things. For this we need:
- 5L plastic container empty;
- scissors and napkins;
- coins in denominations of 5 rubles .;
- PVA glue and water;
- acrylic paint of different colors;
- halves of dried peas for decoration;
- acrylic varnish, felt-tip pen, brushes.
So, we will consider in stages the process of making bread boxes from a plastic bottle:
- It is necessary to cut off the neck and bottom of the selected container. Turn sideways and mark with felt-tip pen from the edge of 8 cm. Cut the canister in half.

- Cut the bottom in advance also cut into two halves.

- Two parts from the bottom will need to be glued to half a five-liter canister on both sides. The parts can be fixed with tape.

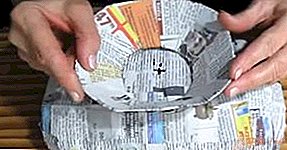
- The next stage is the preparation of the newspaper. It needs to be cut into strips, dilute glue 1: 2. It is necessary to glue the blank from the plastic canister twice with newspaper strips on both sides.

- Now you need to paste over the newspapers with the neck. Wait until both workpieces have dried, and glue the neck as a stand to the future bread box with hot glue.

- Next, we proceed to decorate the product. On the edge you need to draw a wavy line with a coin. Simply attach a coin around the entire perimeter. Spread the product with diluted glue again and glue it with ordinary white napkins in two layers of the product.
- Next, separate the white part of the paper from thick napkins, roll it into thin tubes. Glue them on the edge, moistened in advance in an adhesive solution.
- Halves of dry peas should also be glued with the flat side to the bread box.


- With a felt-tip pen, apply patterns throughout the product, and stick tubules from napkins on them.

- Let everything dry well, only then you can start painting the product. In the photo, the bread box is painted black, but you can choose any colors that will be in harmony with your kitchen.

- Next, you can apply a different color of paint separately on curls, and then on peas. When you achieve the desired result, let the product dry, and cover it with acrylic varnish. Your breadbox is ready.

How to make a bread box from paper or newspapers
A bread box from a newspaper or from paper looks very unusual, at first glance it is difficult to distinguish it from an accessory woven from a rod. For manufacturing you will need:
- newspapers and a thin stick;
- a small tray with sides;
- clothespins.
The first thing to do is make a lot of thin tubes of paper or newspaper. To do this, you need to roll a sheet of newspaper into a very thin tube. You need to start folding the newspaper sheet from the bottom corner, and diagonally to the opposite top corner. The wand is needed in order to wind a newspaper on it, the finished tube is removed later, and is more tightened.
Start weaving the bread box from the lid. Put six tubes tightly next to each other, put two more across top. Fasten them together by two more, braiding them among themselves.

Further, continue the weaving in the same way, applying 2 newspaper tubes next to each other.

Do not stop, and continue. You should get this part.

Find a suitable base, and fasten with clothespins, then continue the process of weaving in a circle. You will need a tray later, because you will need to make an oval-shaped bread box.

Both the base and the cover are woven the same way. Make them the height you need.
Important! If you want to decorate the finished bread box later, you can use the newspaper. If there is no painting, then for production, take ordinary, or kraft paper.
More ideas ...
They look very interesting textile products. They can be square and round, with patterns and without them. Everything is decided by your imagination. A favorite among these items are breadboxes made of wood. They can also be made of plywood by sawing parts along contours. It will be convenient to assemble the accessory with the help of nails and furniture glue.
Paste the cardboard box over textile, sew the insides of the box with a cloth of the same color, or a suitable style. Align the edge with a lace trim. Unusual breadbox is ready.
Useful tips for craftsmen how to make a bread box with their own hands
Many housewives give preference to a product that was created by hand, it conceals a piece of the master’s soul. But we have put together tips for those who want to make a breadbasket on their own.
- If you use wood, choose odorless varieties, as the absorbent bread is able to absorb the aromas of wood.
- Use only high-quality coatings, do not cover the bread box with varnish inside, as all these materials are toxic anyway.
- If you use paper, tubes, napkins in your work, also cover the finished product only outside.
- Insert a paper napkin inside the open textile bread box, so the bread box will last longer.
- In work, try to use those tools that will ensure reliable fastening of parts of the accessory.
Do not be afraid to create, in any case, the end result will surprise you and your family. Handwork won the love of many owners, and a self-made breadbasket will become an adornment of the kitchen.
Leave Your Comment